Soon I’ll be biking through a full fall and winter. It’s pretty exciting. But, I needed a major upgrade on my lighting to make the 23 mile round trip commute more safe.
For the past couple years, I have used a $35 Cateye light procured from my local Perfomance Bike dealer. It got me through a couple of winters with the help of (dimly) lit streets. Also, I had a Bontrager rear light that actually wasn’t that bad. The Cateye was in a word, useless when it came to darkness due to the focused beam – much like an affordable flashlight. My infatuation with a quality light started last late fall when I slammed a dog’s snout on my fork while using my old Cateye. With the thin beam and the dog (possibly fox) jumping out among underbrush I had no chance of avoiding collision. I needed a better light this year without question.
Having the bike and setup I have, I naturally geared to a couple of things- Peter White cycles for lighting products and the possibility of dynamo hubs and specific lights. I spoke to a few people about this that were knowledgable about the subject. I loved the possibility of having a dynamo system but in the end decided not to, for now, in my current situation. In short, I wanted the flexibility of not having my only bike to have a dynamo hub and unnecessarily spinning that hub in the parts of the spring/fall/summer months when I didn’t use it as much. More over, my budget doesn’t allow for multiple wheel setups either so I elected to purchased a quality battery headlight and rear light.
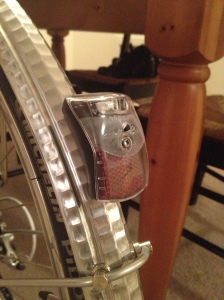
Most of my current route will be pretty dark on the W O&D Trail. As previously mentioned, it is 23 miles in length and only a small portion of that is lit by streetlights. I’ve done a number of test runs the past few weeks and believe it or not, bats love the light and continually fly around my head. Gross. But seriously, the light so far is serving its purpose handedly and has a very wide beam. Ultimately, I decided on the Busch & Muller Ixon IQ rechargeable headlight that spits out 40 lux of light. It is black and the light has two settings – a dim setting for street riding and another high setting for very dark rides. The light came with a German to American socket adapter as well and recharges the light without removing the batteries from the headlight housing. It was the best light he had at that price point. Thanks to his great examples of beams (dynamo & battery) I was pretty confident in my selection. The only downside to it is its weight, I’d imagine due to the number of batteries inside the housing. The fender light I selected was the Spanninga Xba – it drills into the fender and is quite bright. I was surprised initially from the looks of it. It is to be determined if I will need a helmet mounted light, I have a feeling this might come to fruition though.
Deciding which lights to get was the easy part it turns out. I wanted to achieve a randonneur type of lighting setup – light low and off the handlebars so my hands were free to move throughout the ramps and flats. At the very least, the front bag I have now blocked the light’s beam so that wasn’t going to work either. Due to the light’s horizontal cut-off line (which helps to not shine the light at eye level) was another reason why I wanted it low. Plus, it just looks better IMO.
To help achieve this, I made use of my threaded eyelits on my front rack and ordered a light bracket from VO as well as a Paul Component Gino Mount to complete my set up. Respectively, the bracket lowered the light to leave enough room under the front bag (due to the battery light being too tall) and the mount gave the light’s fastener system a “handlebar” to rest on. I could have gotten away with just the Gino mount on my mid-fork or fork dropout’s eyelit but it didn’t work in the end. The right side of the beam was cut off from the tire.
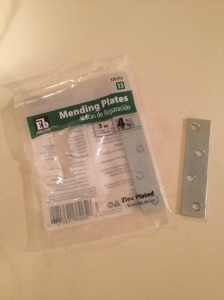
My troubles were not over, after a long test ride, VO’s bracket (to no fault of its own) couldn’t handle the weight of the light so I went back to the drawing board. After looking for specific rack brackets before, I could find none due to my (of course) very specific needs. Through some brainstorming, I decided to try my hand at Home Depot. I figured I would walk through the aisles and take my chances. Bingo! After 30 minutes of looking with a crying baby I persevered and found just the right bracket (see below). The package had several 3” length steel brackets with just the right size holes for my M5 bolts. I couldn’t wait to get home and try it out and luckily it worked perfectly. The steel bracket (so far, fingers crossed) hasn’t bent a millimeter but has enough give for the light to give and take through bumps. It is important to note the front bag takes some of the shake out of the light as well.
I highly recommend this setup if you don’t want handlebar mounted lights but that is just me, I am very particular of my “cockpit” and want nothing attached to it. Aesthetically, the bracket is not anything pretty but, bag or not, it is not highly visible. If you’re in the area and are curious about the brackets let me know. I can show them to you. They fit snugly with M5 bolts and washers. If you have eyelit holes on your for or fork dropouts I would also give the Gino Mount a try just on its own.
Anyhow, I hope I gave someone ideas to think about. There ARE ways around dynamo lighting if your current situation and/or budget don’t allow it. This is just my take.
Photos:
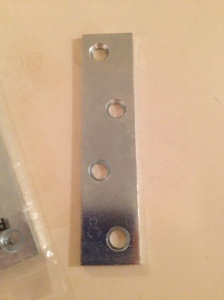
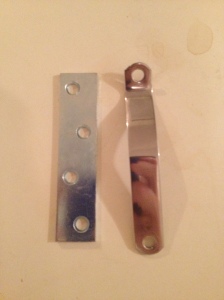

VO’s bracket on the right. Notice the difference in width.
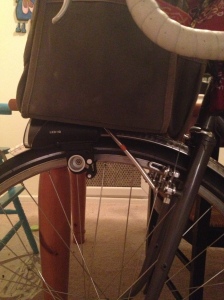
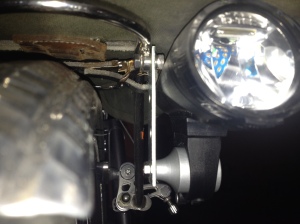
The light looks like it is pushing up on the bag but is actually isn’t. It is even with the top of the rack.
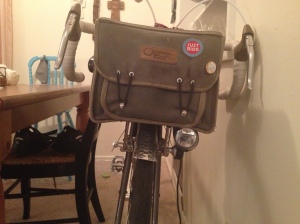
Front View. Light plugged in for tomorrow.